places outside, instead of confining yourself tied up with your TV or DVD player at home? With DVD ripper software on hand, you’re only minutes away from
watching your favorite movies, TV shows and HD media on your Computer or Smartphone.
Now, The Best DVD Ripper invents you to enjoy DVDs at anywhere in the world. As a custom designed program software, Aiseesoft DVD Ripper enables conversion of DVD contents of any format into MP4, H.264, AVI, WMV, FLV, MKV, MPEG-1, MPEG-2, etc, even rips DVD to HD H.264, HD AVI, HD MPG, HD TS, HD WMV, HD MPEG 4, etc, also converts DVD to audio, like MP3, WMA, M4A, AAC, WAV, etc.
Apart from conversion, there are a variety of options to carry out the conversion perfectly – powerful video editing for trimming videos, adjusting
contrast, rightness, frame rates and so on; batch conversion mode to minimize the time for conversion and files in batches; entire movie or parts of it can e
converted at your will; chapters or episodes or segments of videos can e selected for conversion; output video quality can e controlled as you wish y
bitrates, resolution and highest video quality and you can preview all movies prior to ripping them and capture any pictures from your DVD video and save
them as jpeg, gif and mp files.
How to use the Best DVD Ripper
Step 1: Load DVD
Method 1: Put your DVD to your DVD Drive and click “Load DVD” button to add your DVD.
Method 2: You can also click “File” to open the following drop-down menu, and then select

Step 2: Preview movie
After importing the files, click “play” to preview the DVD movie in the left preview window working as the common player.

Tips: It allows you to capture your favorite pictures when you preview and you can view the captured pictures in snapshot folder.
Step 3: Editing
Click “Edit” to open the edit window to adjust the video effects such as Brightness, Contrast , Saturation, Volume, Deinterlacing
Tips 1: Click “Trim” to open the edit window to trim any DVD movie clips.
Tips 2: Click “Crop” to open the edit window to customize the output video play region
Tips 3: Click “Watermark” to edit text and image watermark for the output video files.
Step 4: Merge
If you want to join the selected contents into one file you can click “Merge” button. As default the merged file is named as Merge.
1. Click “Rename” button to name the merge file.
2. Click “Remove” button to delete your selected contents and click “Clear All” button to delete all your added contents.
3. Right click the selected file to select "Move Up" or "Move Down" to adjust the sequences for the merged file.
4. Directly drag other added files to the queue of the merge file.
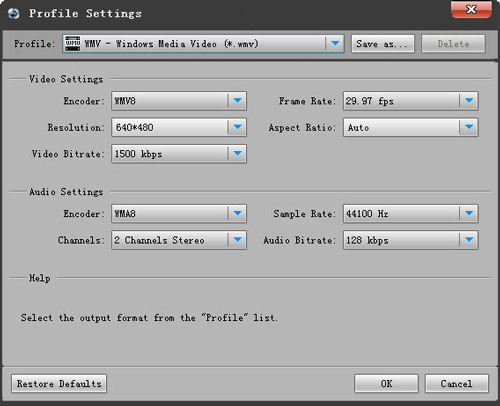
Step 5: Output Setting
Select your desired output format from the categorized in "Profile" drop-down list.
Step 6: Start conversion
Cilck
 button, your movie will be converted with perfect quality and high
speed. At the end, you’ll find your file in the default output folder.

The entire DVD movie can copied perfectly into 1:1 ratio and DVD-9 (dual layer DVD) can compressed to DVD-5 disc – no distortion and no jerkiness while
viewing in your “Pocket DVD Player”
PS: If you want to convert DVD to Mac, you can search Best DVD Ripper for Mac.
No comments:
Post a Comment